|
One of the newest coolest editing options in quake2 are the surface properties and content properties. They are:
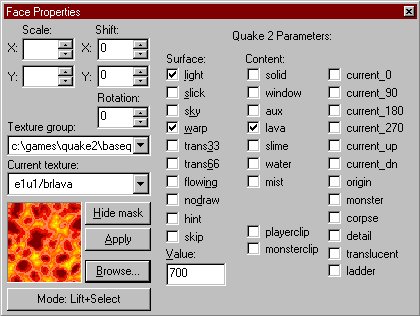
Surface Properties
light
slick
sky
warp
trans33, trans66
flowing
nodraw
hint
skip
Content Properties
solid
window
aux
lava, slime, water
mist
player clip, monster clip
current_0, _90, _180, _270, _up, _down
origin
monster, corpse
detail
translucent
ladder
Differences between a surface property and a content property.
The main difference between surface and content properties is that surface
properties can be applied to any number of a brush's faces. Content
properties must be the same on every face of a brush.
For example, you
could mark one brush face as light, or two face, or three, etc, but for a
detail brush, every face must be marked as detail, or you will get an error
when you compile the level (Entity x, Brush x: mixed face contents) Thanks autolycus for the above info.
How to Set a Surface\Content Property
In each editor setting surface properties are done differently.
Select the brush, press the 'S' key, select the properties you want to set, then hit apply to brush, or apply to face.
Surface properties work the same in QERadient as in BSP. Select the brush, press the 'S' key, select the properties you want, then hit apply.
Select the brush or surface and hit alt-t, select the property you want, hit apply
In QuArK you must select the brush and side you wish to add the surface attribute to and then click (no flag). Here is a screenshot sent to me by nop from co2 that explains how to add surface props. and contents with QuArK
There is no support for surface properties in Worldcraft 1.5. You can download VOILA that will enable to edit the surface properties. Soon WorldCraft 1.6 will be out and it will have full surface property support
Thanks to autolycus from the Forge for sending along a screenshot of how the surface and content properties are handled with WorldCraft 1.6.
Looks very very easy to use and cool!
My pal Richard Neff has sent along this ScreenCam tutorial(405 kb) on how to work with surface properties and contents. So if your a DMM2 user then check em out.
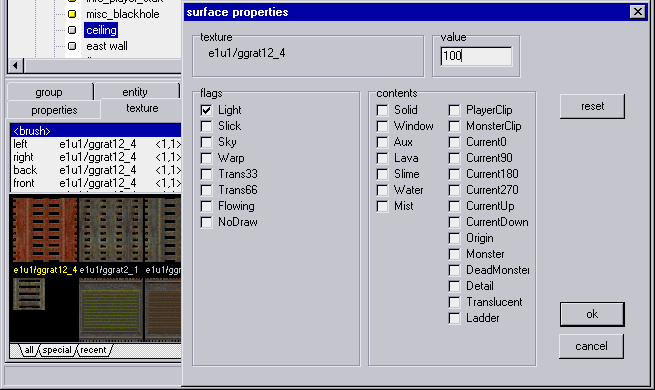
Thanks to my bud eutecTic for sending along the details on how to apply surface/content properties in qED. Here is a screenshot of the surface window in Qed.
1. Select the brush from the level outline (tree view).
2. Select the "texture" tab from the properties notebook.
3. Right-click on the proper brush surface in the list or the top
<brush> line for all brush surfaces.
4. Select "surface attributes" from the pop-up menu that appears.
5. Put a check mark in the proper boxes and set the light value
if necessary.
1. Select the Brush
2. Hit the 'S' key
3. set the properties and remember to hit the 'apply to brush' button
Select the face or brush, press ALT-F, select the properties
you want to set, then hit OK. - thanks Martin Fuchs
If there is an editor I missed(which I did) and you know how to use the surface properties then please email me and I will add it.
What the Surface Properties/Contents Do
This means that the face will emit light the color of the texture. So if you have a yellow texture emmiting light then the light will be yellow. This is probably the most often used and useful surface property. To set the brightness of the light you must enter the number of the brightness in the value edit box that should appear on most editors' surface properties windows'. This is a great alternative for creating your own light entities, because it is much easier and provides more realistic lighting effects.
The only thing that you should know is that sometimes depending on the size of the brush that will be emitting light you will have to set the brightness of the light very bright. Sometimes as high as 10000 is needed.
Slick will make the selected surface slippery and the player will slide. Used in the id level cool1, the Cooling Station. There's an area where you jump on
some crates and hop onto a large piston that takes you up to the next
floor. At the bottom around the piston there's a green slick area you can
slide around in.
Makes the surface warp like water. Should be used when making water, forcefields, lava, etc.
These make the selected surface transparent. 33 means 66 percent transparent, 66 means 33 percent transparent. So therefore trans33 is going to be more transparent then trans66.
You should also remember that entities cannot be transparent, so you couldn't have a transparent func_water, or a transparent func_door, etc.
flowing makes the surface look like it is moving. It is usually used along with the current_ surface properties to create the effect of a river flowing.
It will move in the direction of the texture so if you wish it to flow in a different direction then you need to adjust the rotation of the texture.
This is used for triggers and clip brushes. What it does is makes the selected surface invisible if it is a clip brush or a trigger such as a trigger_once and a trigger_multiple.
By default though, triggers are already set to not drawn.
a hint brush blocks vis from seeing into certain areas, thus decreasing frame rate(which is a good thing) They are difficult to determine where to place though. There is a good tutorial written by Joel Caesar on hint brushes that will help you figure out how to use them.
solid is the default for all brushes. Not real sure on why you would have to use it though.
Prevents the renderer from drawing the backfaces of a brush. Used on windows (or other transparent brushes.) For an example, look at the window at he very beginning of base1.
a skip brush is very strage. It does nothing if a whole brush is set as a skip brush, but if you only set one face of it to a skip brush then it will create the effect of one way glass. The player on the side of the brush that is marked as skip will be able to see through the brush, but not shoot through it, and the player on the sides which are not marked skip will not be able to see through or shoot through the brush.
Does not do anything. I may be wrong though
these 3 are pretty self explanatory. Lava takes off the most damage. Slime takes off a lower amount of damage, and water takes off no damage, unless you stay in it too long.
The brush that has one of these properties turned on will not actually warp like water until you also give the brush the warp property. It will act the same way though without warp set(you will be able to walk through it)
It's cool to use these attributes with different textures, like give the lava attribute to a metal brush, etc for some strange different effects. For example, in the example map i created water but I didnt use a water texture. I used the crystal texture. It turned out pretty good.
mist makes the brush nonsolid, thus you could walk through it. You can also create a mist type effect by setting the mist, warp, and trans_33 properties on. Pretty cool.
|
player clip, monster clip |
The player cannot walk through a brush set with player clip but he will be able to shoot through it. Monster clip is the same thing but it affects the monster_ entities instead of the player. Good for not allowing monsters past a certain point or restricting the player so he/she cant get into areas in which there is a possibility of getting stuck.
You must also have nodraw set for the clip properties to work.
|
current_0, _90, _180, _270, _up, _down |
all the current properties are used to push the player in the selected direction(in water). So current_0 will push the player in the angle of 0, which is straight right.
The majority of the time current_ will be used along with the flowing and water properties to create the effect of flowing, moving water.
the origin property is used with certain entities like the turret_ entities, func_rotate, and func_door_rotating. Check those corresponding pages on how to use the origin property with these entities.
These do nothing at all. I may be wrong though
Detail brushes are very useful. They can be used to decrease vis time for a level. When a brush is marked as a detail brush, vis will ignore it, thus decreasing the amount of time that qvis3 will take while compiling your level.
Too many detail brushes though will actually slow a level down. Try to keep detail brushes restricted to brushes that the player will not often see.
There is a great tutorial over detail brushes and how to use them in more detail over at BSP Headquarters.
if you have water and trans33 or 66 *not* set and the surface
light flag 0 as well, then the water brush interior isn't lighted.
when you set the translucent flag, light from outside can come inside
although the water surface is not-see-thru. thanks Martin Fuchs
the ladder attribute allows the player to climb up or down the brush. Most often used for creating ladders. A number of people have been having problems with creating ladders but they are actually pretty easy to make.
Make the ladder and then give every brush that the ladder is made up of the surface property of ladder. It's that simple. The trouble comes up when you have the steps of the ladder too far apart and the player can't touch the next step. If this is the case then you will have to create a very thin brush right in front of the ladder and set the surface property player_clip and ladder to it. This will create the illusion of the player climbing up the ladder when in fact the player is climbing up the invisible player_clip brush.
Things to Remember about Surface Properties/Contents
All the textures that are used with quake2 and are available for use by level designers have default surface properties already set. For example... If you select a glass texture, then it will already have the trans_33 property on. It also follows that all the light textures, already have the light surface property set and with a light value that the creators of the texture thought was right. All of this can overridden though if you desire.
Surface Properties can also be mixed. So you could have one texture with lava, flowing, current_0, tran_33 all set.
Also remember that the surface properties can have selected faces with properties while, surface contents MUST have the whole brush selected with the same content or a mixed face error will occur.
The example map I made does not show examples of all the surface properties but it does show some potential of some of the cool effects you can get. It also shows how you can misuse the light emitting textures. =) Way too colorful.
Well anyways if you still don't understand please post your questions to the discussion board.
Return to Tutorials Page...
|
|
